Here we'll show you how to pass short messages and commands to your Arduino Yún via Amazon SQS, a simple cloud-based message queue service that makes it easy to pass short messages over the Internet.
This will introduce you to a simple, robust way of passing messages to your Yún from a web-based dashboard, a mobile app, or even another Yún. With the ability to efficiently pass messages to and from your Yún you open up huge range of remote control and remote monitoring applications.
This sketch uses Choreos from our Amazon SQS bundle.
1Make sure you have a Temboo account. If you don't already have one, you can register for a free account here.
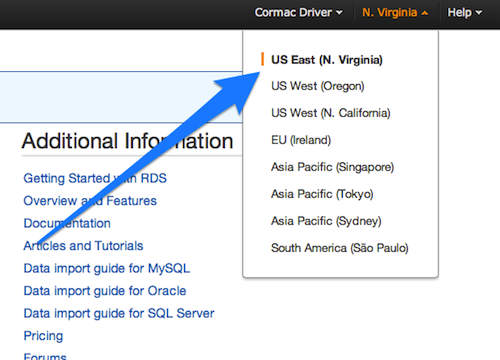
2You'll also need an Amazon AWS account, which you can create here. Once you've created your account, make sure to set its region to US East as shown in the screenshot below.

Setting your AWS account region to US East
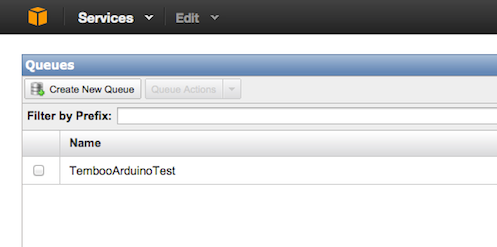
3Create a new message queue via the SQS Management Console. Give your queue a name and ignore the rest of the details.

What you should see when you've created a new message queue via the SQS management console
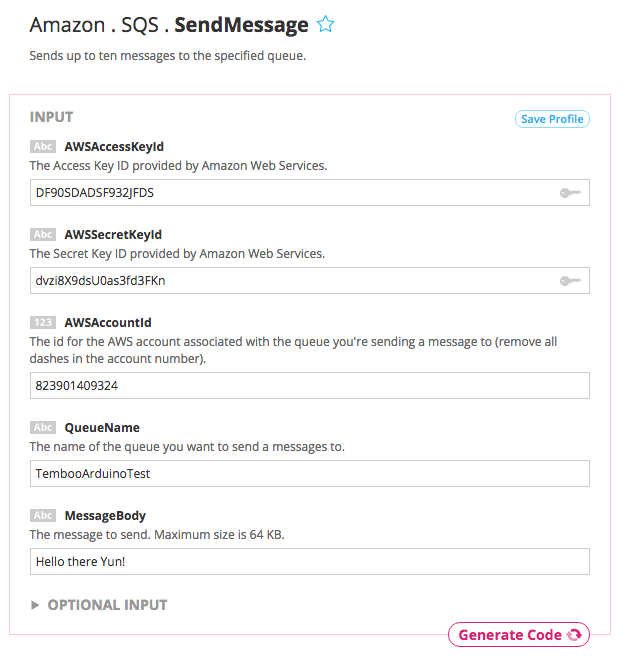
4Next, we'll send a message to your queue via our website so that your Yún has something to receive when we run the sketch below.

The SendMessage Choreo with valid inputs and XML response output
5Now you're all set to get started with the sketch. You'll need the AWS credential info that you gathered earlier, so don't throw it away!
6Make sure that you have the latest version of the Arduino IDE. You should also check that you have the newest version of the Temboo Library by checking the Arduino Library Manager
7Make sure that your Yún is connected to the Internet. Arduino has a helpful guide if you need assistance.
Copy the code below into a new sketch in your Arduino IDE. Replace the placeholder values in the code with your own AWS and message queue details.
Note: again, remember to remove the dashes from your AWS Account ID. It should be in the format "xxxxyyyyzzzz" as opposed to the format "xxxx-yyyy-zzzz".
/*
  ReceiveAmazonSQSMessage

  Demonstrates reading a message from an Amazon SQS queue using the Temboo Arduino Yun SDK.

  This example code is in the public domain.
*/

#include <Bridge.h>
#include <Temboo.h>
#include "TembooAccount.h" // contains Temboo account information, as described below

/*** SUBSTITUTE YOUR VALUES BELOW: ***/

// Note that for additional security and reusability, you could
// use #define statements to specify these values in a .h file.

// your Amazon AWS Access Key ID
const String AWS_ACCESS_KEY_ID = "xxxxxxxxxxxxxxxxx";

// your Amazon AWS Secret Key ID
const String AWS_SECRET_KEY_ID = "xxxxxxxxxxxxxxxxxxxxxxxxxxxxxxxxxx";

// your Amazon AWS Account ID
const String AWS_ACCOUNT_ID = "xxxxxxxxxxxx";

// your message queue name
const String MESSAGE_QUEUE_NAME = "xxxxxxxxxxxxx";

// the message visibility timeout sets the duration in seconds that a received message
// is hidden from future requests to retrieve messages.It is an optional input that is
// specified in seconds.
const String VISIBILITY_TIMEOUT = "43200";


void setup() {
  Serial.begin(9600);

  // For debugging, wait until a serial console is connected.
  delay(4000);
  while(!Serial);
  Bridge.begin();
}
void loop()
{
    TembooChoreo ReceiveMessageChoreo;

    // invoke the Temboo client
    ReceiveMessageChoreo.begin();

    // set Temboo account credentials
    ReceiveMessageChoreo.setAccountName(TEMBOO_ACCOUNT);
    ReceiveMessageChoreo.setAppKeyName(TEMBOO_APP_KEY_NAME);
    ReceiveMessageChoreo.setAppKey(TEMBOO_APP_KEY);


    // set choreo inputs
    ReceiveMessageChoreo.addInput("AWSAccountId", AWS_ACCOUNT_ID);
    ReceiveMessageChoreo.addInput("AWSAccessKeyId", AWS_ACCESS_KEY_ID);
    ReceiveMessageChoreo.addInput("AWSSecretKeyId", AWS_SECRET_KEY_ID);
    ReceiveMessageChoreo.addInput("QueueName", MESSAGE_QUEUE_NAME);
    ReceiveMessageChoreo.addInput("VisibilityTimeout", VISIBILITY_TIMEOUT);

    // identify choreo to run
    ReceiveMessageChoreo.setChoreo("/Library/Amazon/SQS/ReceiveMessage");

    // set output filters
    ReceiveMessageChoreo.addOutputFilter("messageID", "/ReceiveMessageResponse/ReceiveMessageResult/Message/MessageId", "Response");
    ReceiveMessageChoreo.addOutputFilter("messageText", "/ReceiveMessageResponse/ReceiveMessageResult/Message/Body", "Response");


    // run the choreo; when results are available, print them to serial
    ReceiveMessageChoreo.run();

    String messageText;
    String messageID;

    while(ReceiveMessageChoreo.available()) {
       // read the name of the next output item
        String name = ReceiveMessageChoreo.readStringUntil('\x1F');
        name.trim(); // use “trim” to get rid of newlines

        // read the value of the next output item
        String data = ReceiveMessageChoreo.readStringUntil('\x1E');
        data.trim(); // use “trim” to get rid of newlines

        if (name == "messageText" && data.length() != 0) {
          messageText = data;
        } else if (name == "messageID" && data.length() != 0) {
          messageID = data;
        }
    }
    ReceiveMessageChoreo.close();

    if (messageID.length() > 0) {
      Serial.println("Messsage ID:" + messageID);
      Serial.println("Message: " + messageText + "\n");
    } else {
      Serial.println("No new messages...\n");
    }

  delay(2000); // wait 2 seconds between ReceiveMessage calls
}
The sketch above references the TembooAccount.h header file, which contains your Temboo account information.
If you are currently logged in, you'll see your account details in the code snippet below (otherwise you'll see placeholder values). Create a new tab in the Arduino IDE and call it TembooAccount.h. Copy the code below into your new TembooAccount.h tab and then save your sketch.
#define TEMBOO_ACCOUNT "ACCOUNT_NAME"  // your Temboo account name
#define TEMBOO_APP_KEY_NAME "APP_NAME"  // your Temboo app key name
#define TEMBOO_APP_KEY  "APP_KEY"  // your Temboo app key
With both files in place you're ready to upload the sketch and have your Yún retrieve the message from your queue.
When the sketch is running it will be listening out for new messages. One cool thing you can do is send more messages to the the queue and watch the serial monitor update live. To do that, just repeat step 4 as many time as you like.
If you're working with the Yún Shield paired with another Arduino board, you'll need to make some small changes to the Yún sketch above it so that it's compatible with the Arduino Yún Shield.
1First, change the include statement #include <Temboo.h> to #include <TembooYunShield.h>. Your include statements should look like this:
#include <Bridge.h>
#include <TembooYunShield.h>
#include "TembooAccount.h"
2Next, change the Temboo object name from TembooChoreo to TembooYunShieldChoreo. Your code should look like this:
TembooYunShieldChoreo ReceiveMessageChoreo;
3Now your code is ready to run on your Yún Shield!
When you've got this sketch working, you're in a position to build any number of applications that involve passing messages to and from any kind of device. Amazon SQS acts as a simple, robust middleman - your imagination can do the rest. Check out rest of our 2000+ Choreos and start planning your next project.
We're always happy to help. Just email us at support@temboo.com, and we'll answer your questions.